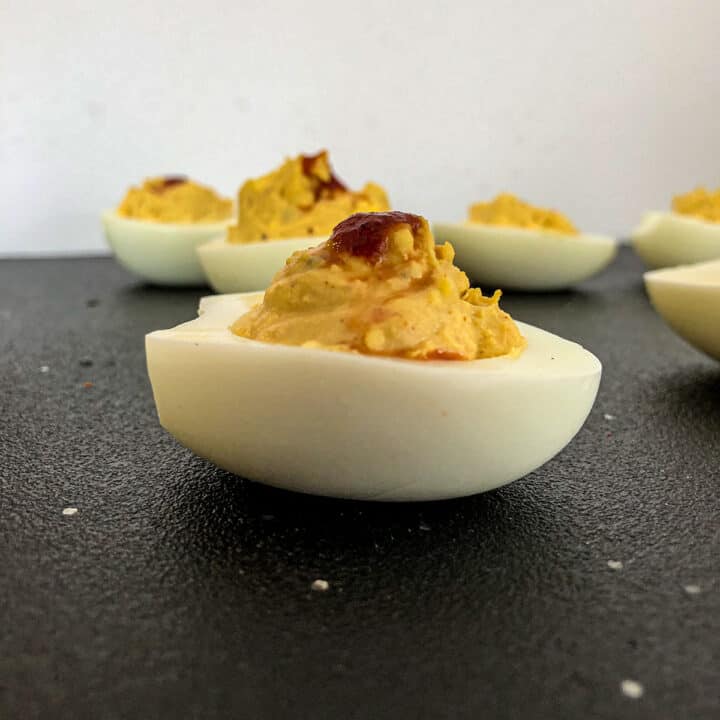
• Recipe Index
  • About
  • Subscribe
menu icon
go to homepage
  • About
  • Recipe Index
search icon
Homepage link
  • About
  • Recipe Index
×
Home

Classic Deviled Eggs

April 1, 2022 by Rhonda Leave a Comment

Deviled egg sprinkled with paprika on a black board.

Easy classic deviled eggs are a perfect appetizer for parties, family get togethers or holidays!

Deviled egg with paprika garnish on black board.

Deviled eggs are right there with apple pie when it comes to favorite foods. No one wants to admit they like deviled eggs, but that deviled egg tray is ALWAYS the first one emptied!

Classic deviled eggs are easy to make, but there are so many variations! We keep it basic here with a classic deviled egg recipe.

Check out our Easy Deviled Eggs 101 for everything deviled eggs! Loaded with information on everything from how to boil eggs to what equipment is helpful, from what the name means to how to decorate and garnish, from making ahead of time to how to save leftovers! We have you covered.

[feast_advanced_jump_to]
Hard boiled and peeled eggs, mayo, dijon, paprika, salt and pepper.

Ingredients

This deviled eggs recipe can't get much easier.

  • Eggs - we like using large eggs for a great two bite appetizer.
  • Mayo - we also love these with Greek yogurt, sour cream, or a combo of all three.
  • Dijon - this is a staple in most kitchens, but you can also use a honey mustard or dry mustard.
  • Pantry staples - salt, freshly ground black pepper, paprika for garnish.

And there you have a classic deviled egg!

Some Basic Deviled Eggs Info

Deviled Eggs:

  • Are hard boiled eggs with the egg yolks removed from the whites, the yolks are mixed with other ingredients and then the whites are refilled with the yolk mixture.
  • Can EASILY be made the day before, just don't garnish until right before serving.
  • Are best served cold!
  • Should be kept refrigerated until serving.
  • Shouldn't be frozen.
  • Have many different options for mix-ins with the yolk filling; relish, pickles, bacon, cheese, etc.
  • Will last up to 4 days in the refrigerator but they will start to lose their freshness after the 2nd day.
  • Can definitely be made with Greek yogurt or sour cream instead of mayonnaise.

Equipment We Used

See Easy Deviled Eggs 101 for a full discussion on equipment we used to make deviled eggs. A hand mixer helps give a smooth egg yolk filling. We find it easiest to use a piping bag with a large round or star tip to fill the egg whites with the yolk mixture. No piping bag? Use a spoon to fill the eggs or cut off a corner of a ziploc bag and use it as a piping bag. NOTE: We don't like single use plastic and recommend you include a reusable pastry bag to your kitchen toolbox!

Mixing egg yolks for deviled eggs.

It can get messy trying to fill a piping bag while trying to hold it open with one hand. Instead, use a tall glass or deli container. Place the piping bag in the container and fold the top down over the sides. This holds the bag open and leaves you with two hands to spoon your filling into the bag!

Believe it or not, a special plate just for deviled eggs is a thing, and if you are lucky enough to have one, now is the time to show it off! Of course, most people don't have one so use what you have; a platter, plate, a tray, a serving board.

Specialty plates for deviled eggs.

How to Assemble Classic Deviled Eggs

We like deviled eggs when the filling is heaped with a piping bag and tip into the egg white. However, they are just as tasty when the filling is spooned in. A sprinkle of paprika over the top makes all the difference. If your paprika comes out too fast (experience speaking here!) try using a small strainer to help control the amount of paprika.

Egg yolk filling in piping bag and egg whites on black board.

Favorite Riffs

There are many variations of deviled eggs and they are all great - so go wild! Some of our favorites filling add-ins are; bacon, cheese, spices, and pickles. Substitute Greek Yogurt or sour cream for the mayo. See Easy Deviled Eggs 101 for more information on substitutions and additions.

We like the flavor dijon mustard adds to the deviled eggs, but it can be left out. Spice it up with a bit of dry mustard or hot mustard instead. For those who like even more kick, try with a hint of horseradish, diced jalapeños, or a dash of cayenne pepper! 

Time Saver Tips

If you really want deviled eggs and don’t have the time to, of just don't want to, boil and peel the eggs, consider buying pre-boiled, peeled eggs. Most grocery stores, Costco, Sam’s, and restaurant food supply stores carry these.

Saving Leftovers

The FDA recommends discarding any perishable food that has been out at room temperature for more than 2 hours.

If you are within the FDA guidelines, you can save leftover deviled eggs in an airtight container up to 3 days in the refrigerator. 

Our Favorite Deviled Eggs Info and Recipes

  • Easy Deviled Eggs 101
  • Feta Deviled Eggs
  • Bacon Deviled Eggs
  • Deviled Eggs with Pickles
  • Spicy Deviled Eggs
Deviled eggs with paprika garnish.

Other favorite appetizers

  • Deep fried potato croquettes in a white dish.
    Cheddar Bacon Potato Croquettes
  • Meatball with brandy blackberry sauce in cocktail spoon.
    Brandy Meatballs
  • Mushroom cap stuffed with buffalo chicken mixture.
    Buffalo Chicken Stuffed Mushrooms
  • Crispy potato skin quarter loaded with pulled pork, sour cream, and green onions.
    Pulled Pork Potato Skin Bites

Classic Deviled Eggs FAQ's

Why are they called deviled eggs?

Many countries have their version of deviled eggs with a different name; stuffed eggs or dressed eggs are two examples. When referring to food in the U.S., the term deviled came from the late 1700’s and referred to spicy, highly seasoned food, or food cooked in hot spices. While the basic deviled eggs get a small kick from mustard, you can definitely spice these up to live up to their name.

Is there a right way to hard boil and peel eggs?

There are many theories on how to hard boil eggs. Our advice is if you have a method that works for you, stick with it. Check out our Easy Deviled Eggs 101 for more information.

Can I decorate deviled eggs?

Absolutely - be creative and have fun! There are a lot of ways to make deviled eggs your own. From how you mix the yolk filling, to how you cut them and fill them, to how you garnish them.

Easy Deviled Eggs 101

April 1, 2022 by Rhonda Leave a Comment

Deviled eggs with bacon on top.

This deviled eggs 101 guide gives you the info you need for a classic appetizer for holidays, parties, or family get togethers!

Deviled egg with paprika sprinkle on black board.

Deviled eggs are right up there with apple pie and homemade ice cream when it comes to favorite foods. It reminds me of family gatherings at Mom's where no one admits they LIKE the deviled eggs, but it is ALWAYS the first tray emptied! We would get requests for deviled eggs at the catering company and, you guessed it, they were always one of the first things devoured!

Deviled eggs are very easy to make, but there are so many variations! Plus, with all the different information coming at you on how to hard boil eggs - it can quickly get overwhelming. We just want a deviled egg! So we break it down here for you.

[feast_advanced_jump_to]

Why Are They Called Deviled Eggs?

We had to do a little research on this, and #fascinating! Deviled eggs exist in many countries under different names; stuffed eggs or dressed eggs are a few. According to assorted English Dictionaries, the term deviled, when referring to food in the U.S., came from the late 1700’s and referred to spicy, highly seasoned food or food cooked in hot spices.

While the basic deviled eggs get a small kick from mustard and pepper, we don't really consider them really spicy or highly seasoned. However, you can definitely spice these up to live up to their name!

Basics to Make Deviled Eggs

The recipes for deviled eggs all include very simple ingredients.

  • Eggs - We like using large eggs to get a nice balance of yolk to white in the deviled egg.
  • Dijon mustard - Most kitchens have dijon in the fridge, but add a little more heat with dry mustard!
  • Mayonnaise - This is the traditional ingredient but we also love the tanginess from Greek yogurt.
  • Seasoning - Season with salt, freshly ground black pepper, and paprika for garnish.
Hard boiled and peeled eggs, mayo, dijon, paprika, salt and pepper.

And the basic steps couldn't be easier:

  • Hard boil and then peel the eggs.
  • Cut the peeled eggs in half and separate the egg yolks from the egg whites.
  • Set the egg whites aside and mix the yolks with other ingredients.
  • Refill the whites with the yolk mixture!

That's all! Minimal ingredients, simple steps, deviled eggs!

1. The Eggs!

Let's Talk Hard Boiling Eggs

There are SO many theories on the best way to get hard boiled eggs perfect! Our advice is if you find a method that works for you and stick with it. We have found the following to be true for us.

  • Adding anything to the pot while boiling the eggs makes no difference in how they boil.
  • Gently boiling for 10 minutes produces eggs just as good as bringing to a boil, covering the pot, and letting sit in the hot water (off the heat) for 20 minutes.
  • Cooking eggs a little too long doesn’t ruin the egg, it just turns the outside of the yolk dark. IT IS STILL GOOD!  However, cooking the eggs way too long can make it rubbery.
  • Running cold water over the eggs right when finished cooking helps stop the eggs from continuing to cook. 
  • The more you hard boil eggs, the better your timing gets.
Hard boiling eggs in pan of water and peeled hard boiled eggs.

Easy Peeling for Hard Boiled Eggs

Everyone has had that moment when they start to peel their hard boiled egg only to find part of the egg coming off with the shell - augh! So frustrating. While we have not been able to find a method to guarantees this will NEVER happen (and we have tried a lot of techniques), we have found some tips that help prevent this. These methods tend to work for us and if you have a method that works for you, stick with it.

  • Fresh eggs are harder to peel than eggs that are a week or so old. 
  • Adding anything to the pot while you boil the eggs makes no difference in how the eggs peel. 
  • Running cold water over the eggs right when finished cooking helps stop the eggs from continuing to cook but doesn't seem to make a lot of difference in peeling the eggs.
  • Peeling the eggs under cold water tends to be a lot easier than not and gives the most consistent results. While most of the country is in or has been in a drought, (and we don’t like to waste water) we recommend a bowl or pot of cold water versus running water.
  • Having said this, we have also totally botched peeling eggs. It happens to all of us. We usually add a few more eggs to our pot when boiling them in case we have some problems peeling them. 

2. Equipment Used To Make Deviled Eggs

At the very basic level, you need a pan (to boil water with the eggs), a bowl to mix the filling, a spoon to fill the egg whites, and a plate to serve the eggs on. However, we have found that with a few additional kitchen tools making deviled eggs becomes even easier and faster!

Egg whites without the yolk and a piping bag.

Piping bag and tips. We like the look from using piping bags and tips to fill the egg whites with the yolk mixture. We also find it is faster and easier, however, it is not necessary. If you plan to do a lot of entertaining, or are starting to experiment with appetizers and decorating, we recommend purchasing some beginning piping equipment. We love Wilton products, but there are definitely other brands that will also work. For deviled eggs, we recommend a LARGE star or round tip (#4 tip or #6 tip work great). A smaller tip will also work, but the filling needs to be very smooth or it will clog the tip. 

No piping bag? Use a small cookie scoop, spoon, or even a ziploc bag (cut one corner off - no piping tip needed) to fill the egg whites. NOTE: To avoid using single use plastic bags we recommend adding a reusable pastry bag to your kitchen toolbox!

Hand Mixer. You can absolutely mix the yolk mixture with a fork, whisk, or spatula. However, if you are doing a lot of deviled eggs and want a nice, smooth filling to go through a piping tip, we found a hand mixer makes this SO much easier - and faster! 

Pro Tip: Filling Piping Bags

Filling a piping bag held open by a cup to make filling easier.

Filling a piping bag while trying to hold it open with one hand always leaves us with a mess. Instead, use a container that is narrower than the top of the piping bag (like a glass or tall deli container). Place the bottom of the piping bag in the container and fold the top down over the sides of the container. This holds the bag open and leaves you with two hands to spoon your filling into the bag!

Platter. Yes, there are such things as deviled egg plates and if you have one, now is the time to show it off! However, use what you have; a plate, a serving platter, a tray, a serving board. If eggs can be refilled during the event, then space them out so they are easy to pick up and look nice. This can be in rows, patterns, or random. If it is not possible to refill the eggs during the event, select a platter that will hold them all.

Deviled egg plates.

3. Favorite Riffs

There are SO many variations of what you can add to the yolk mixture for deviled eggs and we like almost all of them! However, there are also some variations in the basic ingredients that are worth mentioning!

Mayo vs. Sour Cream vs. Greek Yogurt

We tried the classic recipe for deviled eggs with all three of these and found they were all great! People are used to a specific flavor (mayonnaise!) when they bite into a deviled egg, so our recipes list mayo in the recipe as the main binder. However, we really like the use of Greek yogurt instead of mayonnaise. It has a slightly tangy taste which adds some nice depth to the deviled eggs and makes them unique. Another plus - Greek yogurt usually has less sodium and fat than mayonnaise. NOTE: all Greek yogurt is not the same! We like Chobani and use this almost exclusively when using Greek yogurt.

Sour cream also works, but we found it much milder than the mayonnaise without any tang from the Greek yogurt. It was still good, especially if we were mixing in additional ingredients to the yolk mixture, which added more flavor.

Try using a combination of these three to get the tanginess of the Greek yogurt, the creaminess of the sour cream, and the expected flavor of the mayo. Play with the recipe to find your magic combination!

Yolk Filling Add Ins

Deviled eggs topped with feta crumbles on a black board.

There are so many great add-ins you can add to the yolk filling. Here are some of our favorites!

  • Proteins - bacon, salmon, ham, proscuitto
  • Cheese - feta, cheddar, cream cheese, goat cheese, blue cheese
  • Spice - ground cayenne pepper, paprika, chili powder, chili flakes, jalapeños, dry mustard
  • Sauce - hot sauce, adobo chili sauce, ranch dressing
  • Sweetness - pickles, relish, honey, honey mustard
  • Miscellaneous - green onions, avocado

4. Decorating Ideas

There are an almost endless number of ways to make deviled eggs your own. From how you mix the yolk filling, to how you cut them and fill them, to how you garnish them. Let your imagination go and have fun with these. Here are just a few ideas on decorating and garnish.

Garnish

We recommend you garnish the eggs immediately before serving. If done in advance, depending on the garnish used, you run the risk of it soaking into the egg and making it look less appetizing.

  • A sprinkle of paprika over the top makes all the difference in a classic deviled egg. If your paprika comes out too fast (experience speaking here!) try using a small strainer to help control the amount of paprika.
  • Add a piece of crispy bacon, sprinkle of cheese, green onion slice, or drizzle of hot sauce to the top of the egg filling.
  • Stand up a piece of the following in the the yolk filling:
    • Homemade parmesan crisp  
    • Crispy prosciutto 
    • A small paprika shrimp
    • A piece of candied bacon
Deviled eggs with bacon on top.

Decorating

  • Dye the yolk filling green and add a few rosemary leaves with a dice of roasted red pepper to look like holly for Christmas.
  • Dye the whites different colors (after the yolk is removed) in water, food coloring, and a dash of vinegar. Soak for 5-10 minutes until desired color is achieved, gently remove and dry. Fill as directed. 
  • Instead of cutting in half lengthwise, cut a sliver off the large end so the egg will stand up. Then cut the top ⅓ of the small part of the egg. Remove the yolk. Fill the 'standing up' egg white piece with the yolk mixture. Top with the small part like a cap. This will allow you to fill the egg up quite a bit so the ‘cap’ sits on top of the filling.

5. Miscellaneous Tips

Time Saver Tips

Craving deviled eggs but just don’t have the time or bandwidth to boil and peel the eggs?Consider purchasing pre-boiled, peeled eggs. You can get these at many grocery stores, Costco, Sam’s, and restaurant food supply stores.

Deviled eggs with no garnish on a black board.

Make Ahead Tips

Deviled eggs definitely want to be made ahead of time. Fill the eggs but leave the garnish off until ready to serve. The eggs can be stored in an airtight container in the refrigerator for 2-3 days. They will actually last up to 4 days, be safe and taste fine, but after about 3 days they begin to look a little ‘tired’.

Leftover eggs that are not getting eaten, *gasp!* turn them into a nice egg salad and make a sandwich.

Saving Leftovers

The FDA recommends discarding any perishable food that has been out at room temperature for more than 2 hours.

Within the FDA recommendations? Leftover deviled eggs can be saved in an airtight container up to 3 days in the refrigerator.

6. Deviled Egg Recipes To Enjoy!

  • Classic Deviled Eggs
  • Bacon Deviled Eggs
  • Feta Deviled Eggs
  • Deviled Eggs with Pickles
  • Spicy Deviled Eggs

7. Common Deviled Egg FAQ's

Do you serve deviled eggs cold?

YES! Keep the eggs refrigerated until ready to serve. Pull them from the refrigerator, garnish, and serve immediately! Remember the FDA recommendations for perishable food is no longer than 2 hours at room temperature.

Can you freeze deviled eggs?

The short answer is NO. They will not hold up (think texture and eye appeal) if frozen.

Other favorite appetizer recipes

  • Cast iron skillet with hot cheese, corn, and pepper dip and a bowl of tortilla chips.
    Baked Cheesy Corn Dip
  • Deep fried mini jalapeño popper egg roll on a plate.
    Mini Jalapeño Popper Egg Rolls
  • Baked puff pastry square topped with a peach slice and sprinkled with powdered sugar.
    Puff Pastry Peach Tartlets
  • A stack of fried crab cakes on a table.
    Appetizer Crab Cakes
Deviled eggs with paprika sprinkles.

Sugared Pecans

March 29, 2022 by Rhonda Leave a Comment

Sugared pecans in a dish and on a white table.

These sugared pecans have a hint of cinnamon and cloves for a delicious addition to any buffet. Serve them with an easy cheese plate or ice cream bar, or grab a handful for dessert on their own. It's impossible to eat just one!

Roasted sugared pecans.

These sweet pecans (sometimes called candied pecans) are one of our all-time favorite sweet snacks. Pecans + sugar + cinnamon = a sweet and crunchy match made in heaven.

These candied pecans feel fancy, but they're deceptively easy to make. Serve them as a delicious snack, add them to a cheese board, or use a handful for a pop of sweetness in a salad. These also make an incredible homemade gift for the holidays!

[feast_advanced_jump_to]

Sugared Pecan Ingredients

You only need a few staples for these candied pecans. Just mix it all up, bake away, and enjoy this versatile snack!

  • Sugar - A hint of sweetness brings this recipe together!
  • A few spices - Cinnamon and ground cloves lend a deep, cozy flavor to these pecans. You'll also need a pinch of salt to help the flavors pop!
  • Pecans - We love using pre-cut pecan halves for snacking, but you can use smaller pecan pieces to toss into salads or baked goods!
  • Egg white - This acts as a binder to help everything stick to the pecans. Save the yolk and add to your scrambled eggs the next morning.
Ingredients for candied pecans.

Equipment We Used

Hand mixer. We like using a hand mixer for whipping the egg whites, because #lazy. Because the amount is so small using a blender or food processor doesn’t work as well. Whisking by hand also works great!

Silpat. We use this nonstick silicone baking mat to line our sheet pans: it lets the pecans peel right off the sheet pan after baking (no sticking!) If you don't have a nonstick baking mat, use a sheet of parchment paper instead.

Silicone zip-top bag. The easiest way to mix these ingredients is by shaking them together in a big bag. We love using our reusable, washable Mega Stasher Bag for this, but you can also use a plastic zip-top bag. It also works well to toss everything together in a large bowl with your hands or a spatula.

Mixing pecans with whipped egg whites.

Riffs and Substitutions

We love this recipe with pecans, but it will also work with other nuts like walnuts, peanuts, or almonds!

Make Ahead Tips

Make these sugar coated pecans in large batches and store in airtight containers to have on hand as needed. It takes just as much time to make one batch as two! You may need to use multiple large baking sheets to get a single layer while in the oven.

Short on time? Skip whipping the egg whites and just whisk the egg white and water together until combined. While this works just fine, we prefer the airier result from whipping the whites with the water.

Unbaked versus baked sugared pecans.

Saving Leftovers

As long as these are stored in a cool place (like a pantry) and are in an airtight container they will last for 3-4 months. Make sure the container is AIR TIGHT! otherwise the nuts will get stale and soft. 

Other favorite from our recipe collection

  • Mini bacon cheeseburgers with lettuce and tomato held in place with metal appetizer picks.
    Mini Bacon Cheeseburger Bites
  • Deep fried potato croquettes in a white dish.
    Cheddar Bacon Potato Croquettes
  • Spicy prawns on a white plate.
    Spicy Prawns
  • Chocolate chip shortbread cookies on a board.
    Easy Chocolate Chip Shortbread Cookies

Sugared Pecan FAQ's

Do I have to whisk the egg white and water until foamy?

No, but we found that it ends with a much nicer sugared pecan. You can lightly ‘scramble’ the egg white and water and then toss with the nuts. They still taste amazing, but when the egg white is whipped you get an airy coating on the pecans. It only takes an extra minute or two with a mixer and we like the end result better. 

How do I serve these candied pecans?

These are great in a dish for snacking or on a cheese / charcuterie board. They are also great thrown into other dishes: give a rough chop and add to a chicken salad sandwich, on top of a melted brie round, chopped up for muffin topping, or in salad lettuce wraps. 

Can I freeze sugared pecans?

While shelled pecans freeze great, we don't like to freeze sugar coated pecans. The coating sometimes has too much moisture when they thaw which can make the pecan soft.

Dish of sugared pecans.

Strawberry Goat Cheese Crostini

March 25, 2022 by Rhonda Leave a Comment

Crostini spread with goat cheese and topped with a sliced strawberry, drizzle of balsamic reduction and slivers of basil.

Easy strawberry crostini with goat cheese, honey, balsamic reduction, and basil. A sweet and savory bite perfect for any occasion!

Crostini topped with goat cheese, strawberry, balsamic reduction and basil..

This strawberry goat cheese crostini recipe is a delicious summer appetizer for family or entertaining. Fresh strawberries, balsamic reduction, goat cheese, honey, and fresh basil all served on a crispy baguette slice! The perfect combination.

[feast_advanced_jump_to]

Ingredients

These refreshing crostini come together in no time with just a few ingredients! All you need:

  • Baguette - We love using a baguette for perfectly bite-sized appetizers, but this recipe also works with larger slices of crusty bread or sourdough.
  • Strawberries - Fresh, in-season strawberries make all the difference here!
  • Goat cheese - Let it come to room temperature on the counter for 15-30 minutes before assembling to make it easier to spread!
  • honey, olive oil, and lemon juice
  • balsamic reduction
  • fresh basil
Strawberry goat cheese crostini ingredients.

Strawberries not in season?
Try another favorite crostini recipe Caramelized Onion Brie Crostini!

Riffs and Substitutions

These strawberry goat cheese crostini are very versatile - feel free to play around and make them your own! Some of our favorite swaps and additions:

  • Use a drizzle of honey instead of balsamic reduction if you prefer, or skip the reduction and use a very light drizzle of plain balsamic vinegar to save time.
  • Swap the goat cheese for ricotta, whipped feta, burrata, brie, or whipped goat cheese!
  • Use fresh mint instead of the basil if you like.
  • Top with chopped pistachios or walnuts for extra texture!
  • No strawberries? Use raspberries, blackberries, peaches, or tomatoes instead.
Crostini on baking sheets.

Time Saver Tips

Use store-bought crostini or crackers. No time to bake crostini? No worries! Grab some pre-made crostini or a box of crackers to save some time.

Buy pre-made balsamic reduction. Store-bought balsamic reduction is a great timesaver! Look for options with no added sugar for the most similar flavor - some brands add sugar to their reductions, which can affect the flavor and makes it a glaze instead of a true reduction.

Make Ahead Tips

Most of these components can be prepped a day or two in advance and placed in an airtight container until ready to use! What to make ahead of time:

  • Crostini - for more details on homemade crostini see our easy homemade crostini post. Make a day in advance.
  • Goat cheese mixture - refrigerate up to 5 days.
  • Balsamic reduction - this will keep a week or more in the fridge.

You can also slice the berries a few hours in advance and store them in the fridge!

Goat cheese mixture spread on crostini.

Saving Leftovers

The FDA recommends discarding any perishable food that has been out at room temperature for more than 2 hours.

Once assembled, these strawberry goat cheese appetizers will not keep very long. We recommend they be eaten within an hour of making. If your event is going to be longer than that, consider making them in batches as needed. 

Strawberry on top of goat cheese on crostini.

More Favorite Crostini Recipes

  • Baked crostini on a tray.
    Homemade Crostini
  • Grilled tomatoes, onions, and basil on a grilled crostini.
    Grilled Tomato Crostini
  • Crostini topped with goat cheese, pear, honey, and pecans.
    Pear and Goat Cheese Crostini
  • Caramelized onions and melted brie on a crostini.
    Caramelized Onion Brie Crostini

FAQs

What kind of balsamic reduction should I use?

We love making our own balsamic reduction: it's quick, easy, and lasts for weeks in the fridge! (We use it on everything from crostini to pizza to salad to pasta.) If you don't feel like DIY-ing your balsamic, you can also often find pre-made balsamic reduction at the grocery store. Look for a brand without added ingredients (like sugar) for the truest balsamic flavor!

What is the difference between crostini and bruschetta?

People have come to use these terms interchangeably, but they are ‘technically’ different. Crostini are usually made from a smaller diameter loaf of bread that has a less rustic feel - think more even texture - like a baguette. Bruschetta are made from a larger, thicker slice of bread that has a more rustic texture - think lots of nice air holes or sourdough! Both are toasted or grilled. You can use bruschetta for crostini recipes and crostini for bruschetta recipes. To use the correct term, focus on the size of the bread when served. NOTE: we often link bruschetta with the tomato mixture served on toasted bread - bruschetta is 'technically' the term for the bread not the topping.

Strawberry crostini on a black cutting board.

Watermelon Feta Mint Bites

July 13, 2021 by Jessie Leave a Comment

Mint, watermelon and feta cheese on a skewer.

Combine the best flavors of summer in these watermelon feta mint bites. So easy, so refreshing, so amazing! A perfect appetizer for your next party!

Mint, watermelon and feta cheese on a skewer.

The combination of flavors in this watermelon feta mint bite make this a perfect summer recipe. Putting it on a stick makes for a fun, hands-free, delicious addition to your BBQ, summer party, or any event! If you can get watermelon around the holidays these look very 'seasonally-colorful' on your buffet table.

[feast_advanced_jump_to]

Ingredients

3 ingredients! That's it!

  • Watermelon - Summer brings the sweetest, mini, seedless melons!
  • Feta Cheese - We recommend the block feta in liquid, available at most grocery stores.
  • Mint Leaves - Fresh mint leaves bring this all together.

Use a block of feta, not crumbled feta. Block feta can be cut into pieces and pierced with a pick. Most grocery stores carry this in the deli section. We recommend having an extra block of feta on hand until you get comfortable cutting and skewering this cheese. The cheese will sometimes break when skewered. We want to have enough pieces for all the appetizers. PLUS, feta is great on almost anything! Use any leftover feta with this Corn and Zucchini Galette or an Easy Whipped Feta.

A personal-sized (mini) seedless watermelon is perfect for this recipe and so sweet in the Summer! Cut the melon into smaller, bite sized squares. We were able to cut around 64 pieces from one mini melon. Feel free to make melon balls instead of squares if you like.

Watermelon feta cheese in clear bowls with mint leaves on a gray table.

Equipment We Used

Picks. We do not recommend using colored toothpicks as the color can come off on the food. We like to use a reusable toothpick, but recognize if you are hosting a large party this may not be feasible. For large parties use a decorative toothpick when possible - like a bamboo knotted toothpick. These are found at most party stores, some grocery stores, or restaurant supply stores. Here are a few of our favorite pick sources.

  • Wooden toothpicks - Least expensive and easy to get
  • Knotted bamboo toothpicks - Inexpensive and easy to get at many locations
  • Bamboo w/’pearl’ - Step up from basic pick and available at Amazon
  • Metal cocktail pick - Most expensive option but reusable!

Serving. We like standing these watermelon feta appetizers up on a tray, board, or platter. If the platter will be refilled during the event, then space the bites out so they are easy to pick up and look nice. This can be in rows, patterns, or random. If unable to refill during the event, select a platter that will hold them all either spaced or standing up side by side. 

How To Assemble Watermelon, Feta, Mint Bites

Order of assembly. Over the years, we made thousands of these watermelon skewers at the catering company! We found if the melon was on the bottom it would frequently stick to the platter and pull off the pick when guests tried to pick them up. Experiment with the order of ingredients, melon on bottom or feta on bottom, and see which is best for you!

Feta and watermelon are fragile, especially when using picks. Try not to pull the pick out and put it back in the feta as it may break into pieces. If the feta is splitting when you put the pick in, turn the feta to a different side - there seems to be a 'grain' with block feta and if you pierce it 'with the grain' it tends to split. It gets easier to recognize this the more you do. It is always a good idea to have extra feta on hand until you get the hang of this. Save any broken feta pieces and toss into a salad or pasta dish!

Plate of skewers with melon, mint, and feta cheese.

Time Saving Tips

Use pre-cut watermelon. If the pieces are too big, just cut them into smaller bite-sized pieces. 

Make this into a salad! Still delicious and refreshing without the skewers. Remember, you will need plates and forks if serving this way.

Make Ahead Tips

These watermelon feta mint bites can easily be made earlier in the day. Make them and store them in a clean, airtight container. Transfer to the serving platter right before serving. If transporting these to another location use a tall container with a lid, like a deli container, that will allow them to stand up. Too many for a tall container? Use a pan with parchment between layers and cover tight - be careful not to press down on the watermelon and feta skewers as they will break apart.

Saving Leftovers

The FDA recommends discarding any perishable food that has been out at room temperature for more than 2 hours.

If you are within the recommended time, this leftover watermelon feta mint appetizer can be refrigerated. If the pieces are falling off the skewers the next day, pull the skewers out and turn it into a salad!

Other Favorite Summer Appetizers

  • Crostini spread with goat cheese and topped with a sliced strawberry, drizzle of balsamic reduction and slivers of basil.
    Strawberry Goat Cheese Crostini
  • Tomato ,mozzarella, basil skewers with balsamic drizzle on a white platter.
    Caprese Skewers
  • Puff pastry squares baked with tomatoes, corn, and basil.
    Tomato and Corn Pastry
  • Tomatoes, mozzarella cheese, basil, and balsamic reduction on a platter.
    Caprese Platter
Hand holding watermelon feta mint skewer.

Some FAQ's

What type of feta do I use?

Use a block of feta that you can cut into pieces and pierce with a pick. If you can purchase feta in the liquid it will keep the cheese fresher and help it not crumble so easily. Most grocery stores will carry this in the deli section. Remove the feta from the liquid before cutting. If cutting pieces on the larger size, increase the amount of feta, there should still be enough watermelon. We were able to get 30 good size feta cubes from a 12 ounce feta block. We had an extra block of feta in case we broke pieces during assembly. 

What size watermelon do I need?

We like using a seedless, personal (mini) watermelon for 24 watermelon feta mint appetizers. No matter what size melon used, personal size or regular sized, there will be leftover melon. Remember, these should be one-bite so cut the melon into smallish squares or use a melon baller for round pieces. Using a melon baller will take more time and you will get fewer pieces overall, but they look very fancy!

Caprese Skewers

July 13, 2021 by Jessie Leave a Comment

Tomato ,mozzarella, basil skewers with balsamic drizzle on a white platter.

Easy caprese skewers with tomato, basil, and mozzarella are a perfect Summer appetizer! A delicious, bite sized treat easy enough for everyday snacks yet fancy enough for company.

Tomato ,mozzarella, basil skewers with balsamic drizzle on a white platter.

Need a quick, easy, delicious appetizer to serve your guests? This is it - tomato, basil, mozzarella skewers! That's right, just 4 ingredients and ready in just minutes. The perfect bite at any party or Summer gathering!

People love food on a stick, it is fun, cute, and easy to eat! This caprese skewers recipe hits all those marks. So refreshing and colorful, plus vegetarian!

[feast_advanced_jump_to]

Caprese Skewers Ingredients

These caprese salad skewers couldn't be easier or more refreshing!

  • Cherry tomatoes - we like the size of cherry tomatoes but grape tomatoes work just as good, just cut them in half.
  • Fresh mozzarella cheese - we like the pearls because #cute!
  • Fresh basil - look for small to mid-sized leaves, if leaves are too big, tear them in half.
  • Balsamic reduction - we make our own and keep it in the fridge.

Use a good mozzarella cheese!

We like to use fresh mozzarella pearls (or perles). They are a great size, take very little prep and most grocery stores now carry them in the deli section. The ciliegine is a little bigger and will need to be cut. A full size fresh mozzarella ball will also work, just cut it into small squares about the size of the tomato. 

Mozzarella balls, basil leaves, cherry tomatoes, and balsamic reduction in clear bowls.

Where do I get balsamic reduction?

You can purchase balsamic reduction but it is SO EASY to make, much less expensive, and has no added sugars. Follow this recipe for a simple reduction you can keep on hand. Make a batch and keep it in the refrigerator for up to 3 months. Just bring to room temperature before using.

Equipment We Used

Picks. We do not recommend using colored toothpicks as the color can come off on the food. We like to use a reusable toothpick, but recognize if you are hosting a large party this may not be feasible. For large parties use a decorative toothpick when possible - like a bamboo knotted toothpick. These are found at most party stores, some grocery stores, or restaurant supply stores. Here are a few of our favorite pick sources.

  • Wooden toothpicks - Least expensive and easy to get
  • Knotted bamboo toothpicks - Inexpensive and easy to get at many locations
  • Bamboo w/’pearl’ - Step up from basic pick and available at Amazon
  • Metal cocktail pick - Most expensive option but reusable!

It is nice to have a small squeeze bottle for the balsamic reduction - you can even store it in this bottle in the fridge. It makes it easier to drizzle the balsamic or place dots or lines on a serving dish. However, if you don’t have one, just dip a fork or spoon into the balsamic reduction and ‘drizzle’ away!

Clear bowl with balsamic reduction white platter of caprese skewers.

How To Assemble Caprese Skewers

There is no RIGHT way to put these together. We like to keep them manageable so your guests don’t struggle to eat them. Have fun and play with different options to see what works best for the event. Start with a piece of mozzarella, then basil, and then a cherry tomato. Use one larger piece of mozzarella and a whole cherry tomato or two smaller pieces of each. Find your own balance - you just don’t want any one flavor to overpower the others!

Serve standing up for an extra WOW factor! Cut the tomatoes in half and make sure your last piece on the skewer is a piece with a flat side down. Start with half a tomato, then basil, mozzarella pearl, and the other tomato half (flat side down). Do not push the skewer all the way through the last piece. Then stand the mini caprese skewers up with the flat side down. If standing them up use the balsamic reduction to make lines, dots, or cross patterns on the platter and then stand the skewers on top of the balsamic. 

Time Saving Tips

Use small cherry tomatoes and the small mozzarella pearls. Just add the pearl, basil, and tomato to the skewer - don’t worry about cutting them or having them stand up.

Have the tomatoes, mozzarella, basil leaves, and balsamic reduction all prepped in the fridge in individual containers. If extra bites are needed, pull these out and they will be ready to serve in minutes.

We keep homemade balsamic reduction on hand and use it often. Don't have any or time to make any? Purchase good balsamic reduction at the store. NOTE: You will find some balsamic reductions in the store have added sugar (which is actually a balsamic glaze). Try to find a brand with no added sugar for a true reduction that will preserve the flavor you are looking for.

Platter of caprese bites with balsamic drizzle.

Favorite Riffs for Caprese Skewers

We love mixing these up! Add a piece of prosciutto, salami, thin sliced ham, or grilled chicken. Toss the mozzarella pieces with pesto before adding to the skewer. You can use marinated mozzarella if you want, but beware, it can sometimes be overpowering so make sure you have one you like that won’t compete with the other flavors.

Saving Leftovers

The FDA recommends discarding any perishable food that has been out at room temperature for more than 2 hours.

If within the FDA guidelines, these will store in an airtight container in the refrigerator for a day. While they will taste great, the balsamic reduction may make them look less appetizing than the day before. Dress them up by removing from the skewers and tossing with some mixed greens, arugula, or spinach. Add some olive oil and another drizzle of balsamic reduction for a delicious salad with the leftovers!

Some Other Favorite Appetizer Bites

  • Mini buffalo chicken burgers on black board.
    Buffalo Chicken Mini Burgers
  • Mini bacon cheeseburgers with lettuce and tomato held in place with metal appetizer picks.
    Mini Bacon Cheeseburger Bites
  • Board of polenta cakes with different toppings including shrimp, steak, and tomato.
    Grilled Polenta Cakes
  • Meatball with brandy blackberry sauce in cocktail spoon.
    Brandy Meatballs

A few FAQ's

How do I transport these?

These can be tricky when transporting. Use a dish that is tall enough to stand them up side by side with the picks and still get a lid on. We found a tall deli container worked great. If there are too many for deli containers, gently lay them down in a dish with parchment between the layers. Just make sure you can cover whatever container you use without pressing on the skewers.

Can I make these ahead of time?

While these can be made up to a day ahead of time and stored - WITHOUT the balsamic on them - in an airtight container in the fridge, we recommend making them earlier on the day of your event. Basil tends to turn brown after it is torn or cut and stored in the refrigerator and cut tomatoes tend to loose some of their liquid. If stored too long these fancy caprese skewers will still taste great but may not look so fancy.

How long will these tomato mozzarella skewers last?

We like to use these mini caprese skewers the same day they are made. They will last up to 2 days in the fridge but you may sacrifice some quality over time.

Hand holding a caprese skewer.
  • « Previous Page
  • 1
  • …
  • 3
  • 4
  • 5
Honey drizzle on blackberry crostini.

Welcome to Appetizer Bliss! We're sharing our best recipes, techniques, and resources to help you host great gatherings - pulled from more than a decade as professional caterers!

More about us →

Trending Recipes

  • Layers of cheese, pesto, sun dried tomatoes and nuts.
    Sun Dried Tomato and Pesto Spread
  • Flakey baked biscuits.
    Easy Homemade Biscuits for a Crowd
  • Meatball with brandy blackberry sauce in cocktail spoon.
    Brandy Meatballs
  • Baked brie round with brandy pecan topping.
    Easy Baked Brandy Pecan Brie

Spring Recipes

  • Lemon Bars cut into triangles and topped with a dusting of powdered sugar.
    Easy Lemon Bars
  • Smoked salmon spread on toasted baguette slices.
    Smoked Salmon Spread
  • Blackberry simple syrup in a flip top bottle.
    Berry Simple Syrup
  • A stack of fried crab cakes on a table.
    Appetizer Crab Cakes

Footer

About

  • About Us
  • Privacy Policy
  • Terms & Conditions

Recipes

  • Strawberry Crostini
  • The best crostini recipes

Connect

  • Instagram
  • Pinterest
  • Facebook
  • YouTube
  • Subscribe

Copyright © 2022-2025 Appetizer Bliss. All Rights Reserved.